Building an (advanced) NFT bot
Beep boop beep part 3

Part three of a (four?) part series on NFTs. This is the second of several technical articles, read the more interesting part of the story here, and the first technical part here.
If you missed it in my previous article, I included some extremely basic source code to get you started. If you took that and applied the suggestions I gave, you should have a usable minting bot.
But ‘usable’ is for plebs. Lets build an awesome minting bot.
At the end of my last article I teased some advanced techniques that I termed sharding, boosting, spamming, and juicing (and a dated joke to Dodgeball).
I assume these strategies all have official MEV-tard names but I don’t know them, I just made these up.
Note this combination of strategies is mostly useful for Avalanche. You can take ideas and apply them to other chains, but not all of them are valid, and they might require new strategies. There are probably ideas for Avalanche that I’m not considering here. Drop me a note if you think I’ve overlooked something
Spamming - when 10 TX is better than one
Avalanche produces blocks approximately every 2-3 seconds. The lower bound is limited by the time required to reach consensus, and there are some tricky details about the ‘target block rate’ and ‘high block production fee’ that you can ignore.
But if your mint is timed, and each block has a timestamp, when should you send the TX to land in the first block past the target timestamp? Are there other factors to consider, like TX propagation?
Well, the short answer is ‘why bother figuring it out’. Don’t wait until the timestamp to mint. Start sending your TX early, and often. From N seconds before the mint you can start spamming TX, and you can send them every 0.X seconds (limited by the time it takes you to boot your TX). You can stop when the timestamp is reached on your minter.
In my personal experimentation, I saw that a naive TX sender could sometimes send a TX 7 seconds before the blocktime of the block it got minted into. I used a contract that looked like this for my testing:

I recommend you deploy your own version and play around with it on mainnet to confirm behavior.
Boosting - mempool broadcasting shenanigans
After one of my earlier lost mints, I was really confused; why had my spammed transactions just completely missed the target mint block? I had set the gas appropriately and everything seemed good to land in the right spot. But there were several blocks in the middle, each filled with hundreds of (not mine) TX.
My conclusion was that there was an issue propagating the transactions fast enough to get them mined. Fortunately I remembered an enhancement I had played around with in my Crabada loot bot days that could take care of this.
If the issue is with the nodes propagating your TX, why let them be solely responsible for it? You can ‘boost’ this process by manually sending the TX to multiple node endpoints. Open a connection to multiple nodes in your minter, and after you prepare your TX, send it to each of the simultaneously using multiple threads.

The great thing about this is that you can actually verify that it helps; if a node knows about your TX already (it got propagated via the normal mechanism) sending the same TX to it again will fail with an error. If there are no errors, then you sped the process up.
There are a couple of public nodes you can use in your list. You can also set up your own non-validator node(s), which should help the process along.
Sharding - one minter per machine
I’ve discussed how you should use multiple threads if you’re minting for multiple accounts, but when you take the Boosting and Spamming enhancements into account, you will rapidly run into issues with rate limiting.
You could get around this by running your own node(s), but that’s suboptimal; you want to get your TX into the mempool of as many nodes as possible as fast as possible. Using the official nodes (in addition to as many other nodes as possible) will help with this. And the other nodes have even stricter limits than the Ava Labs one.
So the workaround is to run one account per machine/IP. Which is challenging for most of us, having only a single machine to work with. But there are services out there that let you borrow large numbers of machines on demand!
One example is Google Cloud Build. Although it’s pitched as a CI/CD service, it’s actually basically an arbitrary code execution platform on ephemeral machines.

Build all the source (and private keys) into a Docker container and upload it to the container registry, then load it and run the script on each individual worker VM, which is responsible for minting for a single account.
Juicing - pump that gas
Everyone knows that it costs AVAX to create transactions, and that you can ‘increase the gas’ to make your TX go through when the network is busy. But how exactly does that work? This is more complicated than you would expect, but the more esoteric bits and edge cases aren’t really relevant.
But what you do need to know, is that every block has a ‘base fee’ that you need to pay to get included, and the more you pay on top of that the earlier your placement in the block.
For the type 1 ‘legacy’ transactions, the whole amount of gas fee you specify is always paid. You will always overpay using this type of TX, and you should basically never use it. If you want to overpay on gas, you can also do so using a type 2 TX.
Type 2 (EIP-1559) transactions should be used instead. You’ll specify a ‘maxFeePerGas’ and a ‘maxPriorityFeePerGas’.
The maxFeePerGas (in a normal TX) is calculated by getting the recent gas prices and multiplying them by 1.5x-3x. No matter what you set this value to, you’ll only end up paying whatever the block fee is, so for the purposes of your bot you can safely hardcode this to 200-300 and you’ll never end up overpaying. Given the low gas fees since Crabada left for the Swimmer subnet, there’s no reason to agonize over it.
The maxPriorityFeePerGas (aka gas tip) is normally set to 1 gwei. Unlike the maxFeePerGas, you will always end up paying this fee. For type 2 TX inside the same block, the priority fee is what determines the ordering of the TX in the block; higher fee, earlier in the block.
If you’ve implemented all the suggestions so far, you’ll probably be landing your TX inside the block that minting begins, so block placement is now relevant to you (assuming you’re competing against other competent minters). Where you set the priority fee is up to you; remember that you’ll be paying it on not just your successful mint (which will use a lot of gas) but on all the failed mints (which will use less gas but it adds up).
I recommend setting it to 100-200 for a generic mint, and 1K or more for a contested one.
If you’re competing against someone who sends a type 1 TX, the gas they set is compared against your base fee + priority fee when determining block placement.
Bonus: Disgusting mempool perversions
While the Trader Joe mints always become mintable at a specific time, I’ve previously discussed how some mints rely on the owner toggling some value.
I’ve never had the chance to experiment with a validator, but my understanding is that merely having one is not enough; the likelihood that you hear about a pending TX in the mempool is relative to your weighted stake. Having a bare-minimum 2K AVAX validator is probably not enough to be useful.
But if you do have access to one or more good validators, or you’re willing to shell out for @ChainsightLabs mempool access, you should get a heads up before the mint TX goes out and can be even more targeted.
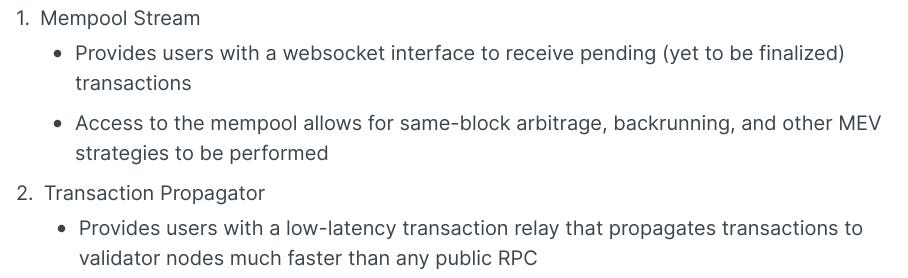
Their Transaction Propagator is basically a better version of the boosting I described earlier.
Wrapping up
If you apply all the lessons from the previous article and this one to the simple minting bot, you should end up with something similar to what I used to successfully win many competitive Avalanche mints.
I’ve since thought of a couple of new things that I’m keeping in reserve for the Trader Joe mint contest. Expect a final update after that wraps up!